Using the Pawsey supercomputers
Dave Tang
2019-10-29
Last updated: 2019-10-29
Checks: 7 0
Knit directory: listerlab/
This reproducible R Markdown analysis was created with workflowr (version 1.4.0). The Checks tab describes the reproducibility checks that were applied when the results were created. The Past versions tab lists the development history.
Great! Since the R Markdown file has been committed to the Git repository, you know the exact version of the code that produced these results.
Great job! The global environment was empty. Objects defined in the global environment can affect the analysis in your R Markdown file in unknown ways. For reproduciblity it’s best to always run the code in an empty environment.
The command set.seed(20190712) was run prior to running the code in the R Markdown file. Setting a seed ensures that any results that rely on randomness, e.g. subsampling or permutations, are reproducible.
Great job! Recording the operating system, R version, and package versions is critical for reproducibility.
Nice! There were no cached chunks for this analysis, so you can be confident that you successfully produced the results during this run.
Great job! Using relative paths to the files within your workflowr project makes it easier to run your code on other machines.
Great! You are using Git for version control. Tracking code development and connecting the code version to the results is critical for reproducibility. The version displayed above was the version of the Git repository at the time these results were generated.
Note that you need to be careful to ensure that all relevant files for the analysis have been committed to Git prior to generating the results (you can use wflow_publish or wflow_git_commit). workflowr only checks the R Markdown file, but you know if there are other scripts or data files that it depends on. Below is the status of the Git repository when the results were generated:
Ignored files:
    Ignored:    .Rhistory
    Ignored:    analysis/.Rhistory
Note that any generated files, e.g. HTML, png, CSS, etc., are not included in this status report because it is ok for generated content to have uncommitted changes.
These are the previous versions of the R Markdown and HTML files. If you’ve configured a remote Git repository (see ?wflow_git_remote), click on the hyperlinks in the table below to view them.
| File | Version | Author | Date | Message |
|---|---|---|---|---|
| Rmd | 71cb648 | davetang | 2019-10-29 | wflow_publish(“analysis/pawsey.Rmd”) |
| html | da75402 | davetang | 2019-10-16 | Build site. |
| Rmd | 8bb0af0 | davetang | 2019-10-16 | SLURM number of tasks |
| html | ac1dcad | davetang | 2019-10-16 | Build site. |
| Rmd | b1387b3 | davetang | 2019-10-16 | wflow_publish(“analysis/pawsey.Rmd”) |
| html | 888517f | davetang | 2019-10-16 | Build site. |
| Rmd | 51ea4c8 | davetang | 2019-10-16 | wflow_publish(“analysis/pawsey.Rmd”) |
| html | 362d652 | davetang | 2019-08-26 | Build site. |
| Rmd | a0e29ec | davetang | 2019-08-26 | Remote visualisation |
| html | 94ca24e | davetang | 2019-08-22 | Build site. |
| Rmd | 69e0aee | davetang | 2019-08-22 | GNU parallel |
| html | b872df5 | davetang | 2019-08-22 | Build site. |
| Rmd | e6c9142 | davetang | 2019-08-22 | Job arrays |
| html | 5e952b2 | davetang | 2019-07-26 | Build site. |
| Rmd | aa8e4d5 | davetang | 2019-07-26 | Abstract supercomputer |
| html | 149fa66 | davetang | 2019-07-16 | Build site. |
| Rmd | 346f268 | davetang | 2019-07-16 | Shifter |
| html | a0ef9b7 | davetang | 2019-07-12 | Build site. |
| Rmd | 389bd42 | davetang | 2019-07-12 | First commit |
Supercomputer
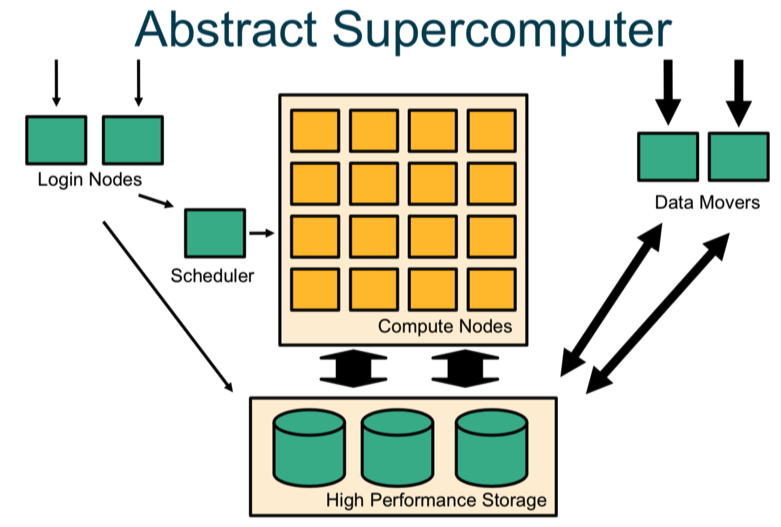
A supercomputer is a computer with a high level of performance compared to a general-purpose computer. The typical way to interact with a supercomputer is via the terminal (once you have logged onto the login/head node) and through a scheduler. The computation will be carried out on the computer nodes; each node has multiple cores. You can also log on directly to “data movers”, which are used to download and upload data. All servers have access to the shared high performance storage servers.
Quick guide
All Pawsey supercomputers use SLURM to manage queues; for those familiar with PBS or SGE, you will have to learn a new set of commands. Below are the most common commands:
sbatch <job script>- Submit job script to the queuesalloc <options>- Request interactive jobsqueue --start- Show estimated start timesqueue <-u username>- Check jobs for a particular user in the scheduling queuesqueue -p <partition>- Display queue/partition entriesscontrol show job <job_id>- Show job detailsscancel <job_id>- Delete job
Logging in
Once your account has been created you can login via SSH. I highly recommend logging in via SSH keys.
File system
These are different file systems mounted; read this page to find out more. Remember that:
  1) neither /group nor /scratch are backed up.
  2) All files in /scratch which have not been accessed
      for more than 30 days will be purged.
Data transfer
NEVER USE THE LOGIN NODES for transferring large amounts of data; you should use the datamover nodes. These nodes are accessible through the generic hostname hpc-data.pawsey.org.au or through the “copyq” queue for batch processing through scheduler. For more information check out this guide: https://support.pawsey.org.au/documentation/display/US/Transferring+files.
You can SSH into one of the data moving nodes.
ssh dtang@hpc-data.pawsey.org.auYou can use curl to transfer files from Pawsey to Cloudstor. You can create a new directory on using the website and transfer files to that directory; the example below transfers files to the root directory.
curl -T test.txt --user dave.tang@uwa.edu.au https://cloudstor.aarnet.edu.au/plus/remote.php/webdav/Queuing system
Remember:
- A SLURM partition is a queue
- A SLURM cluster is all the partitions that are managed by a single SLURM daemon
In the Pawsey Centre there are multiple SLURM clusters, each with multiple partitions. You can submit a job to a partition in one cluster from another cluster.
The three essential commands:
sbatch job_script.slurm
squeue
scancel jobid
To list partitions type:
sinfoIt is important to use the correct system and partition for each part of a workflow.
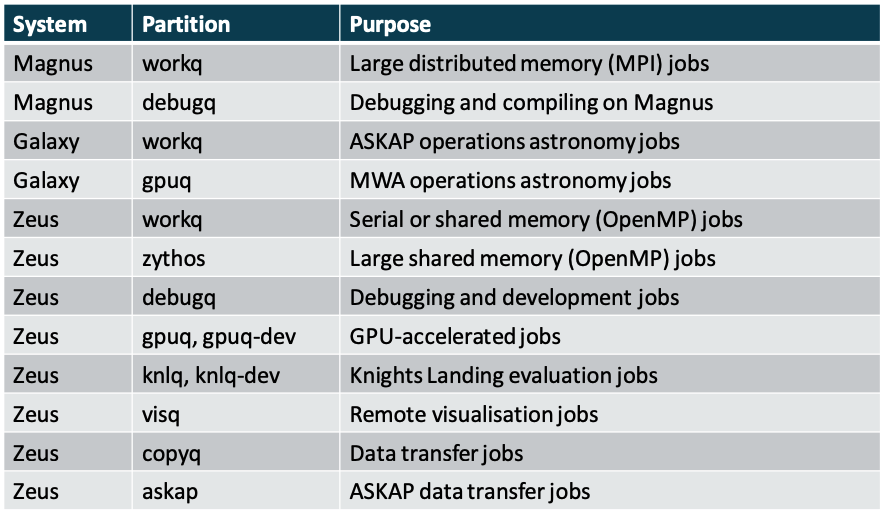
SLURM partition
Jobs on Zeus have a maximum walltime of 24 hours on regular queues; exceptions are as follows: debug queues (debugq, knlq-dev, gpuq-dev) have 1 hour, longq has 96 hours, and copyq has 48 hours. Partitions workq, debugq, and longq have 28 cores per node and 128 GB of memory.
Note that even though partitions state that they will provide 128G of memory, in practice less than 128G of memory is accessible! Your jobs will hang if you require memory and the node is unable to provide it; annoyingly your job will still seem to be running but nothing will be reported in the Slurm output file. I found out recently (2019-10-29) that highmemq now allows jobs to run for 96 hours! Therefore, I recommend using highmemq instead of longq, which provides less than 128G of memory.
To list out the limits of each partition use scontrol; in the example below you can see that the maximum walltime that you can request on workq is one day and you can request up to eight nodes.
scontrol show partition

PartitionName=workq
   AllowGroups=ALL AllowAccounts=ALL AllowQos=ALL
   AllocNodes=ALL Default=YES QoS=N/A
   DefaultTime=01:00:00 DisableRootJobs=NO ExclusiveUser=NO GraceTime=0 Hidden=NO
   MaxNodes=8 MaxTime=1-00:00:00 MinNodes=0 LLN=NO MaxCPUsPerNode=UNLIMITED
   Nodes=z[043-122]
   PriorityJobFactor=0 PriorityTier=0 RootOnly=NO ReqResv=NO OverSubscribe=FORCE:1
   OverTimeLimit=NONE PreemptMode=OFF
   State=UP TotalCPUs=2240 TotalNodes=80 SelectTypeParameters=NONE
   JobDefaults=(null)
   DefMemPerCPU=4096 MaxMemPerNode=UNLIMITED
   TRESBillingWeights=CPU=1
Use squeue to display the status of jobs in the local cluster; the larger the priority value, the higher the priority.
squeue

# queue for specific user
squeue -u dtang

# queue for specific partition and sorted by priority
squeue -p workq -S p
Individual job information.
scontrol show job jobidJob request
SLURM needs to know two things from you:
- Resource requirement: how many nodes and how long
- What to run
Try to ask for the right amount of resources because:
- Over-estimating the resources will mean it will take longer to find an available slot.
- Under-estimating the time required means the job will get killed.
- Under-estimating memory will mean your job will crash.
You cannot submit an application directly to SLURM; SLURM executes on your behalf a list of shell commands. In batch mode, SLURM executes a job script which contains the commands as a bash or csh script. In interactive mode, type in the commands just like when you log in.
sbatch interprets directives in the script, which are written as comments and not executed.
- Directive lines start with #SBATCH
- These are equivalent to
sbatchcommand-line arguments - Directives are usually more convenient and reproducible than command-line arguments
Below is an example script.
#!/bin/bash -l
#SBATCH --partition=workq
#SBATCH --job-name=hostname
#SBATCH --account=director2120
#SBATCH --nodes=1
#SBATCH --tasks-per-node=1
#SBATCH --cpus-per-task=1
#SBATCH --time=00:05:00
#SBATCH --export=NONE

hostname
Use --export=NONE to start with a clean environment, improving reproducibility and avoids contamination of the environment.
Use sbatch to submit the job.
sbatch hostname.slurmParallel applications are launched using srun.
Use salloc instead of sbatch for interactive jobs. Use -p to request a specific partition for the resource allocation. If not specified, the default behavior is to allow the slurm controller to select the default partition as designated by the system administrator.
salloc --tasks=16 --time=00:10:00
srun make -j 16
Number of threads
When specifying the number of threads, make sure you know the parallel programming model that is used by your library or software. The manner in which you issue the number of tasks may affect how your program runs. The arguments to pay attention to are:
--ntasks=# : Number of "tasks" (use with distributed parallelism).
--ntasks-per-node=# : Number of "tasks" per node (use with distributed parallelism).
--cpus-per-task=# : Number of CPUs allocated to each task (use with shared memory parallelism).
Therefore, using --cpus-per-task will ensure it gets allocated to the same node, while using --ntasks can and may allocate it to multiple nodes. You may get by by simply specifying--ntasks but you should do some testing with a smaller dataset.
#!/bin/bash -l
#SBATCH --nodes=1
#SBATCH --time=04:00:00
#SBATCH --partition=workq
#SBATCH --ntasks=16
#SBATCH --export=NONE
Job arrays
Use job arrays to run embarassingly parallel jobs. In the example below, we are requesting that each array task be allocated 1 CPU (--ntasks=1) and 4 GB of memory (--mem=4G) for up to one hour (--time=01:00:00).
#!/bin/bash -l
#SBATCH --job-name=array
#SBATCH --partition=workq
#SBATCH --account=director2120
#SBATCH --array=0-3
#SBATCH --output=array_%A_%a.out
#SBATCH --error=array_%A_%a.err
#SBATCH --time=01:00:00
#SBATCH --ntasks=1
#SBATCH --mem=4G
#SBATCH --export=NONE

FILES=(1.bam 2.bam 3.bam 4.bam)

echo ${FILES[$SLURM_ARRAY_TASK_ID]}
Use bash arrays to store chromosomes, parameters, etc. for job arrays.
GNU parallel
Use GNU parallel to run multiple jobs. Below is an example of calling variants using freebayes from BAM files.
#!/bin/bash -l
#SBATCH --job-name=call_variant
#SBATCH --partition=longq
#SBATCH --time=96:00:00
#SBATCH --account=director2120
#SBATCH --tasks-per-node=12
#SBATCH --ntasks=12
#SBATCH --mem=64G
#SBATCH --export=NONE

vcf_dir=/home/dtang/group/project/salt/data/vcf/
bam_dir=/home/dtang/group/project/salt/data/bam/
genome=/home/dtang/group/data/genome/tair10.fa

module load parallel

parallel --verbose "/home/dtang/group/bin/freebayes -f $genome -iXu -C 2 -q 1 {} > $vcf_dir/{/.}.vcf" ::: $bam_dir/*.bam

/home/dtang/script/send_email call_variant me@davetang.org
Remote visualisation
Some remote visualisation tools can be used on the Pawsey systems; you simply need to log into https://remotevis.pawsey.org.au/auth/ssh. Follow this guide for step-by-step instructions.
Please make sure you are running only one remote visualisation session at any given time. If you want to open another session, make sure to close the first one before opening another one. The wall time for an interactive remote visualisation session is 8 hours.
Shifter
Shifter is a software package that allows user-created images to run securely on the Pawsey supercomputers, even on a large scale; these images can be Docker images or other formats. I have some notes on Docker, which may be useful.
To test shifter, you can start with an interactive session.
salloc --tasks=16 --time=00:30:00Then load the Shifter module.
module load shifterPull a test image.
sg $PAWSEY_PROJECT -c 'shifter pull ubuntu:latest'

# quit interactive session
exit
Here’s an example batch script that pulls the ubuntu image and simply outputs the release version of Ubuntu.
#!/bin/bash -l
#SBATCH --nodes=1
#SBATCH --time=00:10:00
#SBATCH --partition=debugq
#SBATCH --export=NONE

module load shifter/18.06.00

shifter pull ubuntu:latest
srun --export=all -n 1 shifter run ubuntu:latest cat /etc/os-release
/home/dtang/script/send_email shifter me@davetang.org
You would submit the job as per usual.
sbatch test.slurmSome useful links on Shifter:
- https://support.pawsey.org.au/documentation/display/US/Containers
- https://github.com/PawseySC
- https://github.com/NERSC/Shifter-Tutorial
- https://pawseysc.github.io/container-workflows/07-hpc-shifter/index.html
R
The Rocker project has various Docker images for R users. There are also images for Bioconductor.
In the example below, I use an image that has the tidyverse package installed with R.
sg $PAWSEY_PROJECT -c 'shifter pull rocker/tidyverse'

# mount volumes the same way as Docker
shifter --image=rocker/tidyverse --volume=/home/dtang:/data R
Set .libPaths() once inside R and install packages as usual; you can create a folder in /group to store your install packages, so you don’t have to reinstall them again.
Creating your own image
Example Dockerfile to be created locally on your own computer or server that has Docker installed.
FROM fedora:latest

LABEL maintainer="me@davetang.org"

RUN yum -y update \
   && yum -y install dnf \
   && yum clean all

RUN dnf install -y davfs2 \
   && usermod -aG davfs2 root

WORKDIR /data
Push to Docker Hub; remember to change credentials for Docker Hub to your own login.
docker login docker.io

# you can use docker tag to re-tag an existing local image
# docker tag irds davetang/irds

docker push davetang/irds
Pull on Zeus.
sg $PAWSEY_PROJECT -c 'shifter pull davetang/irds'Project management
Use https://portal.pawsey.org.au/origin/portal/ to manage team (only available to PI). Use pawseyAccountBalance to get information on quotas.
Usage:
    pawseyAccountBalance [options]

     Options:
       -project=id      specify project to query
       -cluster=name    specify cluster to query
       -storage         also give storage information
       -mygroups        print information about all groups the user is in
       -yearly          report usage for whole year, by quarter
       -users           also give breakdown by user
       -help            brief help message
Use module to load pawseytools and use pawseyAccountBalance to output number of hour allocations and storage quota in /group/director2120/.
module load pawseytools
pawseyAccountBalance -p director2120 -u -storage
sacct displays accounting data for all jobs and job steps in the Slurm job accounting log or Slurm database.
sacctGetting help
To contact the helpdesk, simply send an email to help@pawsey.org.au.
Useful links
- https://github.com/PawseySupercomputing
- PBS vs. SLURM
- https://hpcc.usc.edu/support/documentation/slurm/
- https://hpc.nih.gov/apps/cellranger.html
sessionInfo()R version 3.6.1 (2019-07-05)
Platform: x86_64-apple-darwin15.6.0 (64-bit)
Running under: macOS Mojave 10.14.6
Matrix products: default
BLAS: /Library/Frameworks/R.framework/Versions/3.6/Resources/lib/libRblas.0.dylib
LAPACK: /Library/Frameworks/R.framework/Versions/3.6/Resources/lib/libRlapack.dylib
locale:
[1] en_AU.UTF-8/en_AU.UTF-8/en_AU.UTF-8/C/en_AU.UTF-8/en_AU.UTF-8
attached base packages:
[1] stats graphics grDevices utils datasets methods base
other attached packages:
[1] forcats_0.4.0 stringr_1.4.0 dplyr_0.8.3 purrr_0.3.2
[5] readr_1.3.1 tidyr_1.0.0 tibble_2.1.3 ggplot2_3.2.1
[9] tidyverse_1.2.1
loaded via a namespace (and not attached):
[1] Rcpp_1.0.2 cellranger_1.1.0 pillar_1.4.2 compiler_3.6.1
[5] git2r_0.26.1 workflowr_1.4.0 tools_3.6.1 zeallot_0.1.0
[9] digest_0.6.21 lubridate_1.7.4 jsonlite_1.6 evaluate_0.14
[13] lifecycle_0.1.0 nlme_3.1-141 gtable_0.3.0 lattice_0.20-38
[17] pkgconfig_2.0.3 rlang_0.4.0 cli_1.1.0 rstudioapi_0.10
[21] yaml_2.2.0 haven_2.1.1 xfun_0.10 withr_2.1.2
[25] xml2_1.2.2 httr_1.4.1 knitr_1.25 hms_0.5.1
[29] generics_0.0.2 fs_1.3.1 vctrs_0.2.0 rprojroot_1.3-2
[33] grid_3.6.1 tidyselect_0.2.5 glue_1.3.1 R6_2.4.0
[37] readxl_1.3.1 rmarkdown_1.16 modelr_0.1.5 magrittr_1.5
[41] whisker_0.4 backports_1.1.5 scales_1.0.0 htmltools_0.4.0
[45] rvest_0.3.4 assertthat_0.2.1 colorspace_1.4-1 stringi_1.4.3
[49] lazyeval_0.2.2 munsell_0.5.0 broom_0.5.2 crayon_1.3.4